| |
|
|
-Project
H1 Mach III
|
|
|
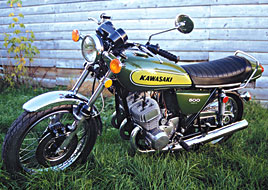
We will be restoring our 1970 H1 and show you how we do it. |
||
|
This page is to
document the restoration of our 1970. The Kawasaki H1 was introduced
in 1969 and was an instant legend. With three cylinders, this 500cc
two stroke had performance that was incredible for a bike of any size.
Yours truly, |
 |
|
| Throughout this restoration, you'll find that a lot of the parts used are items that we sell. We are not trying to promote our own products. However, many of the new parts used on our project bike are from the shelves of our store. | ||
 |
 |
|
|
Restoration
commences.
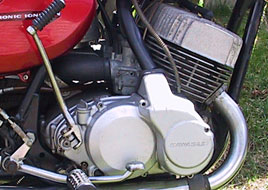
Here's the heart of our triple. It is a runner but the compression is a little low and we're going to rebuild the crank and go through the transmission. While apart, all mechanical issues will be addressed and everything will be repainted, replated and re-polished It's going to look as good as it runs. |
 |
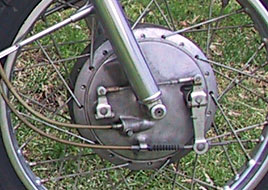
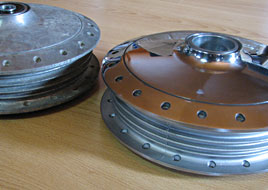
Dull aluminum, minor corrosion and yellowed cables. We'll be replacing the rim and spokes. The hub and backing plate will be polished. They were never polished to a mirror finish and we are going to bring back the original appearance rather than over restore them. We have new cables to replace all of the originals and a correct Dunlop tire for the front. |
 |
 |
|
|
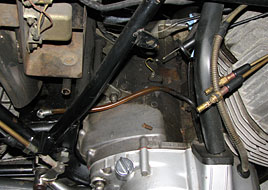
The area under the carbs is always dirty. We'll clean the crankcases thoroughly once the motor is apart and the cases are empty. Some people sandblast, but I find that it makes the finish very rough and you also run the risk of getting glass bead in small holes and crevices. |
|
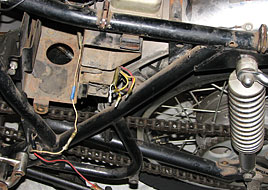
Battery boxes often rust badly due to battery acid spillage. This one is not bad. Notice the cheap crimp on connector on the battery wire? There will be none of these on our finished bike. At this age it is hard to find a bike that doesn't have at least a few of these. |
 |
 |
|
|
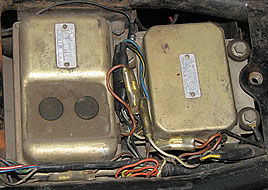
This bike was a good runner and these ignition boxes A & B will just need to be refinished on the outside. When buying a non running early H1, you should hear an audible hum when the ignition switch is in the "on" position. If you don't hear it, chances are good that one or both of these boxes are no good and can rarely be repaired. They are VERY expensive if you can find a good used one. |
|
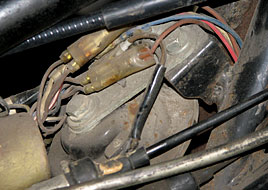
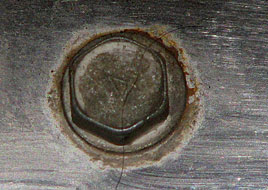
This H1 was well used but most bolts had never been turned since the day it was assembled in 1970. This is ideal because bolts will be of the correct type and wire routing can be photographed to make reassembly simple with no guessing. We have a couple of these in the shop to use as reference but I still take lots of pictures. |
 |
 |
|
|
Here
is a close up of our repainted fuel tank. We had a perfect sample for
color matching under the side panel emblem. It had never been removed,
so UVs have not faded it at all. The stripes on the side are painted
in pearl white like the originals. The rest of the graphics are decals
from our inventory.
|
|
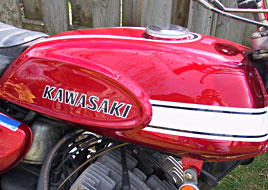
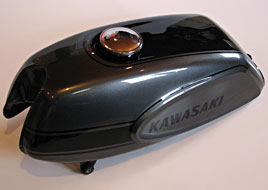
Part way through the project there is a change of plans. This H1 was going to be red which looks great but a Peacock Gray H1 is something you don't see every day. This paint scheme far more difficult to duplicate because all of the graphics are painted on. No decals at all on this tank. We are building a 2nd 1970 H1 which will use the red parts that we had painted for this project. |
 |
 |
|
|
Replacing
the oil level gauge on the oil tank is a small but important detail.
The originals are always yellow and hard as a rock. Reusing it is sometimes
not possible even if you want to.
|
|
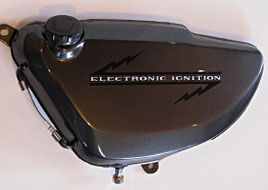
Our freshly painted oil tank with new level gauge in place. It looks like new. An NOS cap is hard to find and very expensive if you do. This cap was polished by hand and turned out great. The "electronic ignition" decal is one of our reproductions which was clear coated over top. |
 |
 |
|
|
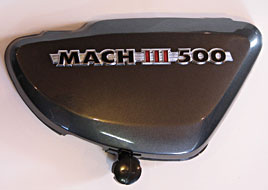
The
side panel has a new "MACH III" badge. I polished knob and
the threaded rod on the back was zinc plated. Don't just clean off the
rust or it will be back in no time. The rubber damper on the back is
new. If you can't find one, a small section of black hose of the right
diameter cut to size works fine and doesn't show.
|
|
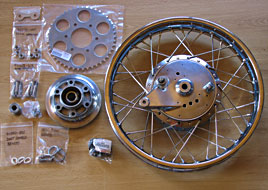
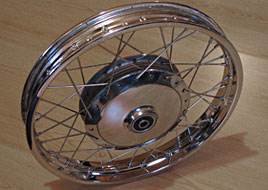
I used the original rear hub and replaced the spokes with new zinc plated replacements like the originals. The rim is a new DID part. The sprocket has the correct pattern and the new lock washers and fasteners are all genuine Kawasaki. The other assorted pieces of brake hardware have been re-zinc plated and the rubber dampers are also NOS parts. |
 |
 |
|
|
The
front hub was sandblasted then polished. This hub was pitted but with
patience and some work it looks like new again. Polishing aluminum parts
is not something that I like to do but the end result is well worth
it.
|
|
The polished hub laced to a new DID rim with new spokes. Before building the wheel it is advisable to replace the bearings and seals whether they seem "okay" or not. They are inexpensive and the newer sealed type bearing kits are far superior to the originals. For restorers doing a concours resto, this upgrade cannot be seen. |
 |
 |
|
|
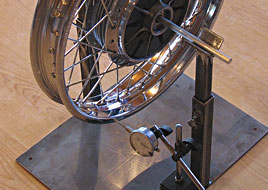
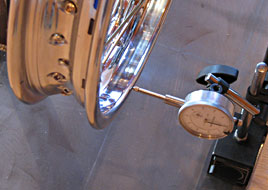
I
prefer to do everything myself including rebuilding the wheels. The
original offset was measured before disassembling the old back wheel
to match the correct offset when building the new wheel. I designed
the stand to be used for truing wheels and balancing them once the new
tires are on.
|
|
When the spokes were tightened during assembly, I took the extra time to tighten each group evenly to save time and effort at the truing stage. It paid off. When I set the wheel up on my stand and used a dial indicator it was well within spec and would have been fine as is but a few adjustments had it just right. The DID rim and the spokes are all right off our shelves. |
 |
 |
|
|
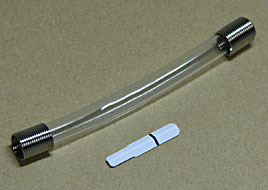
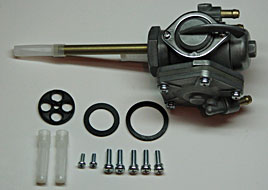
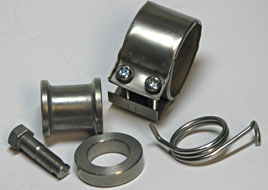
Rebuilding
an old petcock is very simple. It must be completely disassembled and
thoroughly cleaned. All screws, o-rings and gaskets are replaced. This
image shows all of the parts that were replaced during the petcock rebuild.
In most cases the diaphragm can be reused.
|
|
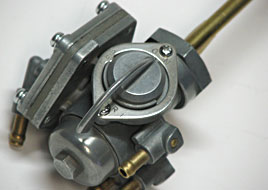
Now it looks and works like new. It is wise to polish the back of the lever to a smooth finish. This prevents damage to the new gasket when the lever is turned. While it was apart, I also re-zinc plated the retainer holding the lever in place. |
 |
 |
|
|
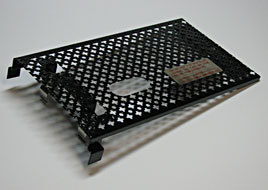
The
heat shield on our bike was restorable but I chose to replace it with
this excellent reproduction that is indistinguishable from the original
and already finished in black. New mounting brackets were also used
and the warning label is one of ours. The original shield was stamped
metal and not easy to straighten.
|
|
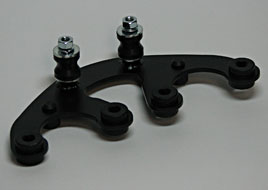
The bracket to attach the speedometer and tachometer was bent and we decided to replace it. In many cases replacing damaged pieces makes more sense than repairing on old one. All of the rubber dampers and hardware are new. |
 |
 |
|
|
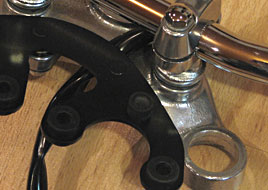
This
image shows the new bracket installed with new hardware and rubber dampers.
Note the rough casting on the lower handlebar bracket and the aluminum
steering stem bracket. To keep the rough texture of this part, you must
polish it by hand. We will go into detail when the gauges are disassembled
and restored.
|
|
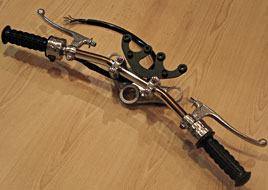
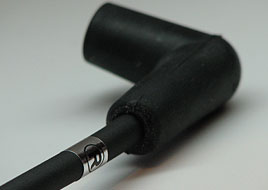
We now have the handlebars and controls restored. I prefer the low bars that were optional in North America. The switch covers were restored using an NOS part as a guide to duplicate the original finish. The wiring is covered in new black sleeving because the old one was brittle and fell apart. The handgrips are new Genuine Kawasaki. |
 |
 |
|
|
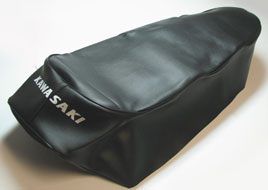
The
seat cover is a reproduction. This image shows the cover before installing
it. Our metal seat pan was sandblasted and repainted and fortunately
the foam was perfect. The stainless steel trim was polished and the
rubber dampers were all replaced. When it is finished, we'll add a picture
of the finished seat. Click here to see how you can restore damaged seat trim.
|
|
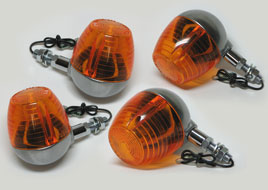
When restoring an early H1, turn signals were optional in many countries. Even the finest restorations usually have long stem, chrome Suzuki turn signals modified to fit the Kawasaki bee-hive lenses. They look okay but they are not correct. NOS turn signals are next to impossible to find these days. These cast aluminum units are "exact" replicas that are so good that you can't tell the difference. |
 |
 |
|
|
Take lots of pictures and have a lot of zip lock bags on hand. There are so many different fasteners of different lengths, sizes and finishes that you "must" not mix up if you want to do a top notch restoration. I replace all that I can with NOS if I can find an exact match. Undoubtedly some originals that I can replace will have to be sent of to get zinc or chrome plated.
|
|
Some of the small parts and special fasteners are difficult to find must be reused. I zinc plate many of the small pieces myself. It is not difficult or very time consuming. This picture shows that a variety of different parts can be zinc plated if new replacements cannot be located. Don't remove the corrosion from parts without re-plating them as they will start to rust again immediately. |
 |
 |
|
|
The original wire labels were made from aluminum. I have not found NOS replacements so I made these. These decals wrap around the wires and unless you look very closely, nobody will know but you. |
|
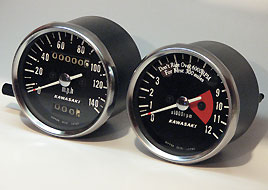
We couldn't use aged looking gauges on our H1. They were restored using our own gauge face decals and help from Z-Resto. Click here to see how it was done. |
|
Stay tuned for more updates as our project
continues
|
|
Here
are some of our other restorations
|
 |
 |
|
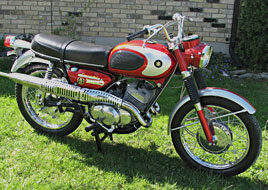
| The restoration of this TC250 was done to the standard they were when they rolled off the assembly line. It is not a "better than new" restoration. This is what you would have bought back in 1968. | |
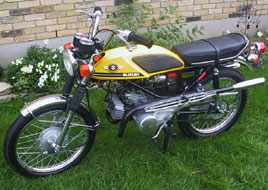
Our 1970 T125 Stinger II was restored in 2005. It was awarded "best in show" & "best vintage bike" it's first time in show competition. It looks great and it is fun to ride. This bike is now a permanent part of our collection. |
 |
 |
|
|
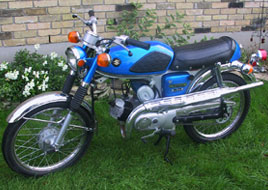
This
1969 AS50 Colt was completed early in 2005. It was in rough condition
but relatively complete. A good friend Gerald, known to some as "Suzuki
Canada" knew I wanted it. A deal was eventually struck and I got
a project bike and he now has carbon fiber exhaust for his Katana. Little
did I know how tough it is to find certain parts for this model. It
was well worth the effort.
|
|
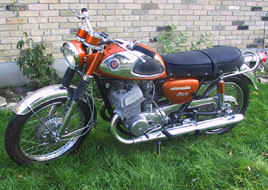
Our 1968 T500 Cobra
also came to us as a complete bike. This one ran but the motor was completely
rebuilt. It was disassembled to restore and spent about 5 years in boxes.
When all of the parts to complete it were collected, it didn't take
long to assemble this very nice early T500. Restoration was completed
in 2004. |
 |
 |
|
|
Our
first restoration was this 1974 H1E. It was given to me by a friend
who was glad to be rid of it along with all of the boxes of junk that
were once a motor. This old triple has won numerous awards and it was
ridden and enjoyed for years. It has a special place in our collection.
|
|
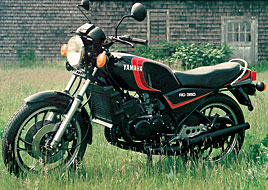
Just about every collector has or wants an"LC". This ex racer was my daily rider until a piston seizure forced me to rebuild the top end. Not being the type to go half way, the motor came apart for seals and a thorough overhaul. While the motor was out I decided to take it a step further and completely restore it to stock. This RD350J has had many show wins over the years. |
 |
 |
|
|
In
1966 this 175cc Bridgestone Hurricane Scrambler was something special.
It has a powerful rotary valve twin cylinder more with chrome bores.
The quality and engineering was ahead of it's time and it is one of
the more unusual bikes in our collection. Although they are not common,
parts to restore this machine were not hard to find.
|
|
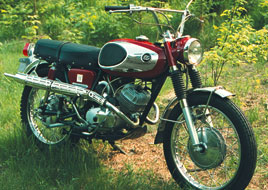
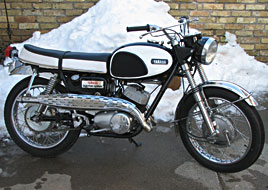
This 1966 Yamaha YDS3C Big Bear Scrambler was not a full restoration. We got this machine in good original condition. A few NOS parts and some new paint were all that was required to make it look and run great. It even has the original seat and the air pump under the fuel tank. |
 |
||
|
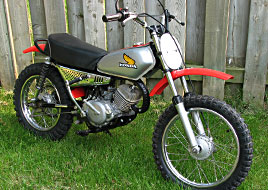
Don't
let this picture deceive you. This Honda Elsinore is the "knee
high" MR50. It is a 1975 K1 model. In the mid 70s this was the
MX bike to have for kids wanting a real dirtbike. It has a 50cc two
stroke motor with a clutch and 3 speeds. It is quick and quite rare
in this condition.
|
|
|
|
Here
at Reproduction Decals we are committed to the preservation of motorcycling
history.
We don't just sell parts and graphics. We restore and ride vintage bikes. |
|
PARTS
SOURCES
|
|
Reproduction
Decals
100 Bessemer Road, Unit 4 London, Ontario N6E 1R2 Canada Reproduction Decals & NOS and reproduction parts e-mail: stickers@reproductiondecals.com telephone: 519 668-7152 |
| Wheel Building Service | ||
| Decal Application Instructions | ||
| Applying Decals on Plastic Parts | ||
| Seat Stencil Application Instructions | ||
| What if we don't have the decals for your motorcycle? | ||
| Frequently Asked Questions and Policies | ||
| BK Custom Coatings - Our Recommended Painter | ||
| Contact Us | ||
| Customer's Comments | ||
| Customer's Bikes - See our decals in use | ||
| Restoring Seat Trim | ||
| Restoring Gauge Faces - Back Lit Meters | ||
| Restoring Gauge Faces - Side Illuminated Meters | ||
| Restoring our 1970 Kawasaki H1 - In progress | ||
| Restoring our 1968 Suzuki TC250 Scrambler | ||
| Restoring our 1970 Suzuki T125 Stinger II | ||
| NOS Honda Keys. We have thousands! | ||
| Restoring an SL70 - Randy Marble shows us how | ||